Setup Web Push Notifications on iOS and iPadOS for Safari
Apple has finally released iOS and iPadOS 16.4, which now supports web push notifications for web apps. Full support is now available for iOS and iPadOS home screen apps. Follow this guide to prepare your website to get users to opt-in and send notifications to iPhone and iPad users across the world.
Push Notifications are currently available for Safari browser, Google Chrome and Edge on iPhone and iPad with iOS and iPadOS 16.4. Web push notifications allow you to engage and target your customers with relevant and personalized notifications even when they are not on your website.
Web push notifications on iOS work a bit different than Android and desktop platforms. iOS requires the user to add your website to their Home Screen and then open the Web App (Check below for Safari Web Push Notification Demo running on iPhone). Once the user opens the app, they can allow permission and your web app will run similar to a native app. It will show up in app switcher separate from Safari, have its own Notification settings and will receive notifications similar to other apps.
Video: iOS Safari Web Push Notification Demo (iOS 16.4)
Mobile Web Push Requirements for iOS and iPadOS
- Your web app must serve a Web Application Manifest file (manifest.json).
- The user needs to install the web app shortcut to their Home Screen using the Share menu in Safari.
- A user generated action is required to bring up the permission prompt on the web app installed on the Home Screen.
If your website already is a Progressive Web App (PWA), no changes are required to make your site compatible with iOS web push notifications. For others you can follow the guide below.
Setting up your Website for Mobile iOS Web Push Notifications
Here are the 5 steps to enable and send push notifications to Safari on iPhone and iPad:
- Create a Web Application Manifest for your website (manifest.json)
- Prompt and encourage users to install your web app to their iPhone or iPad Home Screen.
- Integrate PushAlert on your website, by adding the smart code and uploading the service worker on your website root (sw.js)
- Deploy and test your web app on Safari running on iOS 16.4 or later.
- Send relevant notifications to iOS Safari users.
1. Creating a Web Application Manifest for your website, compatible with iOS
A web app manifest is a JSON file which tells the OS how your website should look once it is opened from the Home Screen. It contains metadata which includes colors, icons to use for the web app along with its name.
We have made it easy to create your custom web app manifest (manifest.json) with our inbuilt manifest generator, available in your PushAlert Dashboard.
Using the Web App Manifest generator:
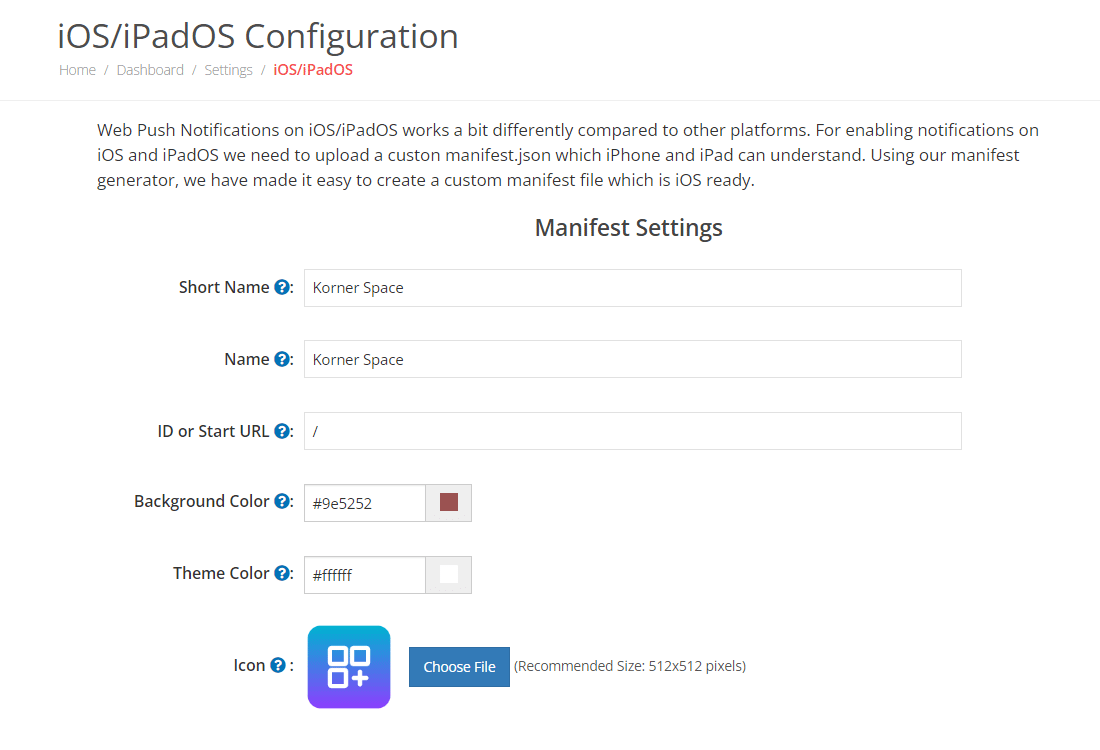
The PushAlert Web App Manifest generator is available under Settings > iOS/iPadOS Configuration. Once there you will be able to generate your own custom manifest. The basics of a manifest required by iOS are all included there, however if you want more customization you can refer to the manifest guidelines and build your own.
Basics of a Web App Manifest required for iOS web push notifications:
- short_name - Represents the name of the web application shown to the user if there is not enough space to display the complete name. It's recommended that the short name should not exceed 12 characters.
- name - Represents the name of the web application as it is to be displayed to the user. Most browsers restrict the name length to 45 characters.
- id - This is used to uniquely identify a web application. The id member is processed similar to the start_url. This is where the web app will load, once you open it from the Home Screen. Generally set to '/'.
- background_color - Defines a placeholder background color for the application page to display before its stylesheet is loaded. We recommend matching the background_color to your website's background-color CSS property.
- theme_color - Defines the default theme color for the application. This may affect how the OS displays the web app.
- icon - This icon will be used on the home screen to identify your app shortcut. We recommend 512x512 PNG image for the icon.
Fill in the above manifest fields and download the generated manifest.json file. Then upload the manifest to the root of your website for e.g. if your website URL is example.com, the manifest should be reachable at example.com/manifest.json. If you are unable to upload it to the root of your website, please reach out to our support team for help.
1. If you make any changes to the manifest fields, please re-generate the manifest.json file and re-upload it to your website, replacing the previous file.
2. If you are using our Shopify app, WordPress or WooCommerce Plugin, Magento Extension, then you do not need to upload the manifest file. It will be updated automatically when you click on Save.
2. Prompting users to save your Web App to their iPhone or iPad Home Screen
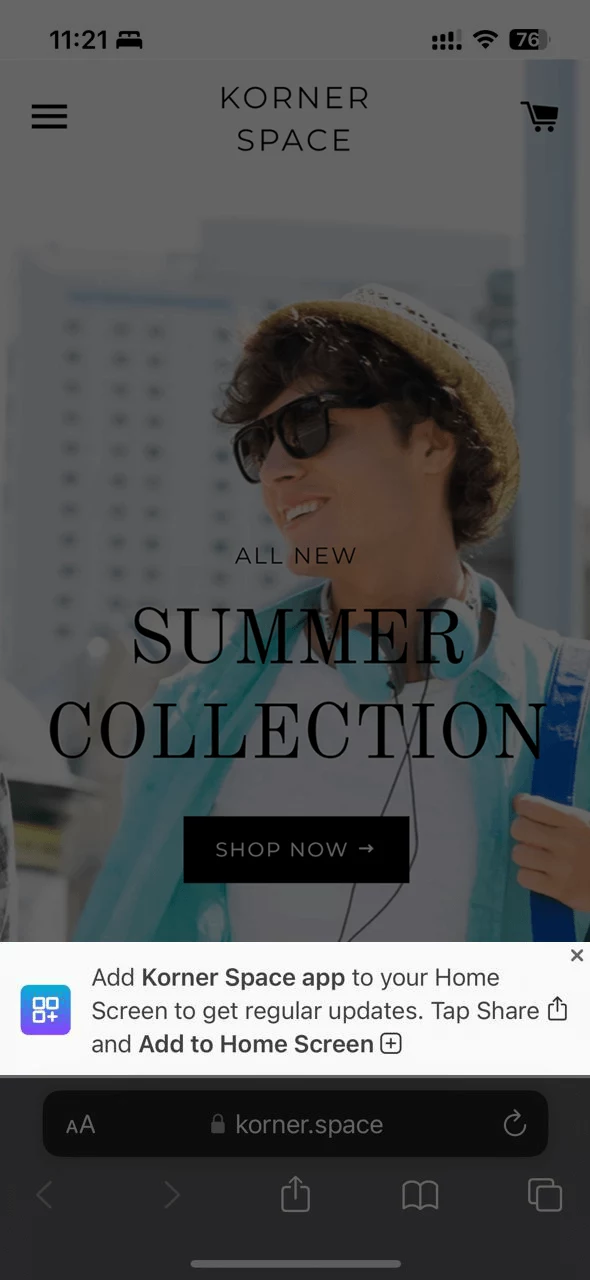
To help your customers to get acquainted with push notifications on Safari, we have built a customizable prompt. The new prompt directs the users on how to save your web app to their Home Screen and then proceed to allow notifications.
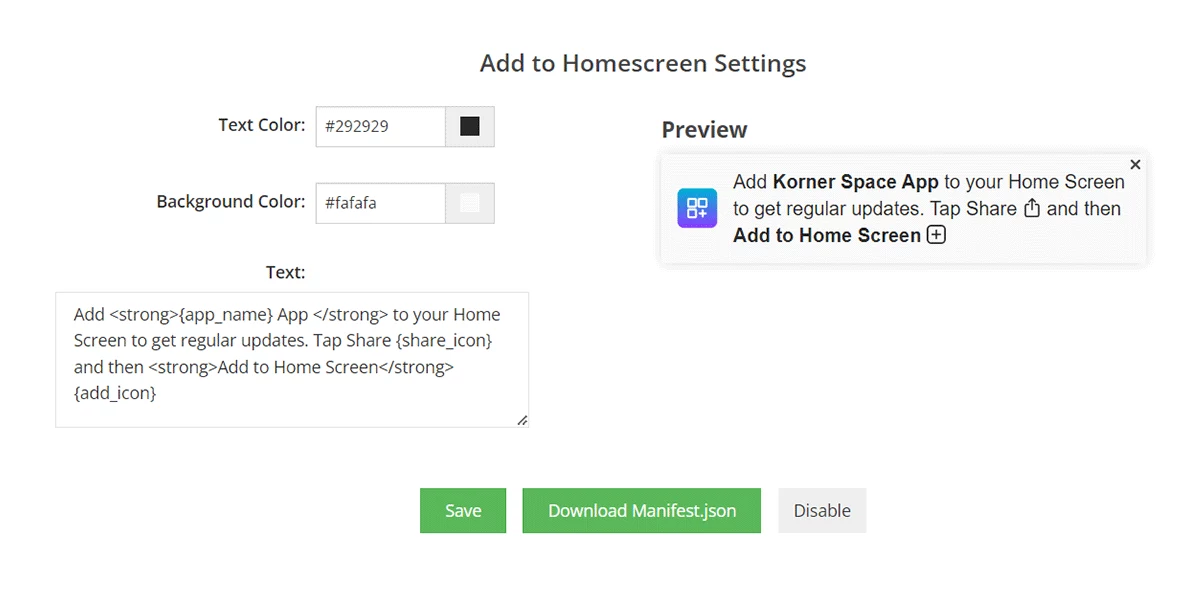
There is one major difference between web push notifications on other platforms and iOS. On iOS and iPadOS, users first need to save your website to their Home Screen, only then they can be prompted for notification permission. With our custom prompt, we help you guide users to save your web app to their home screen using the share option. Followed by on-screen prompts to allow notification permission within the saved web app. For a seamless experience, we recommend customizing the prompts to match your site theme, and provide a context as to why users should download your Web App.
The new Add to Home Screen prompt for iOS can be customized from the iOS/iPadOS Configuration under Settings. You can customize the font color, background color option along with the text you want to show.
Once you have uploaded the manifest and customized the new prompt, you can then click on Enable. This will enable the iOS web push notifications for your website.
3. Integrate PushAlert Web Push Notifications on your Website.
The next step is to integrate our service on your website. Till now we expect that you have generated the manifest and uploaded to your website root and enabled web push for iOS. After that you can follow one of our integration guides to add our service to your website to enable prompting for web push permission.
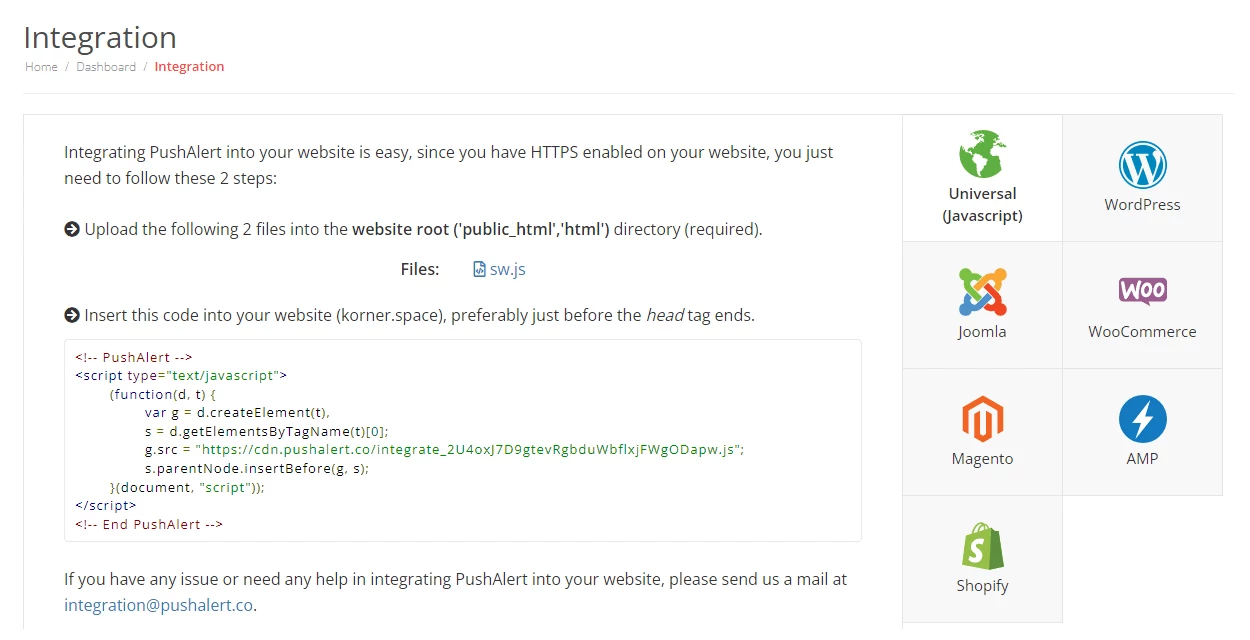
The universal integration works across all platforms with a simple JavaScript that goes in the head section and the service worker (sw.js) which needs to be uploaded to your website root. If you are on Shopify, WooCommerce, Magento, WordPress, Joomla or other CMS, you can also use our plugins and extensions to add web push to your web app.
If you require a custom integration with specific location for service workers, manifest or custom prompting, please reach out to our support team.
4. Deploying and testing your web app on iOS 16.4 or later.
Once you have uploaded the manifest and integrated the service, the next step is to test on Safari.
You can check the Safari web push demo video above to check how the integration works and see if the same is working for you or not. If you face any issues with the setup, please reach out to support.
5. Sending web push notifications to iOS and iPadOS users (Safari on iPhone and iPad)
Once you have successfully integrated the service on your website, and tested subscriptions on iOS, you can now begin sending notifications.
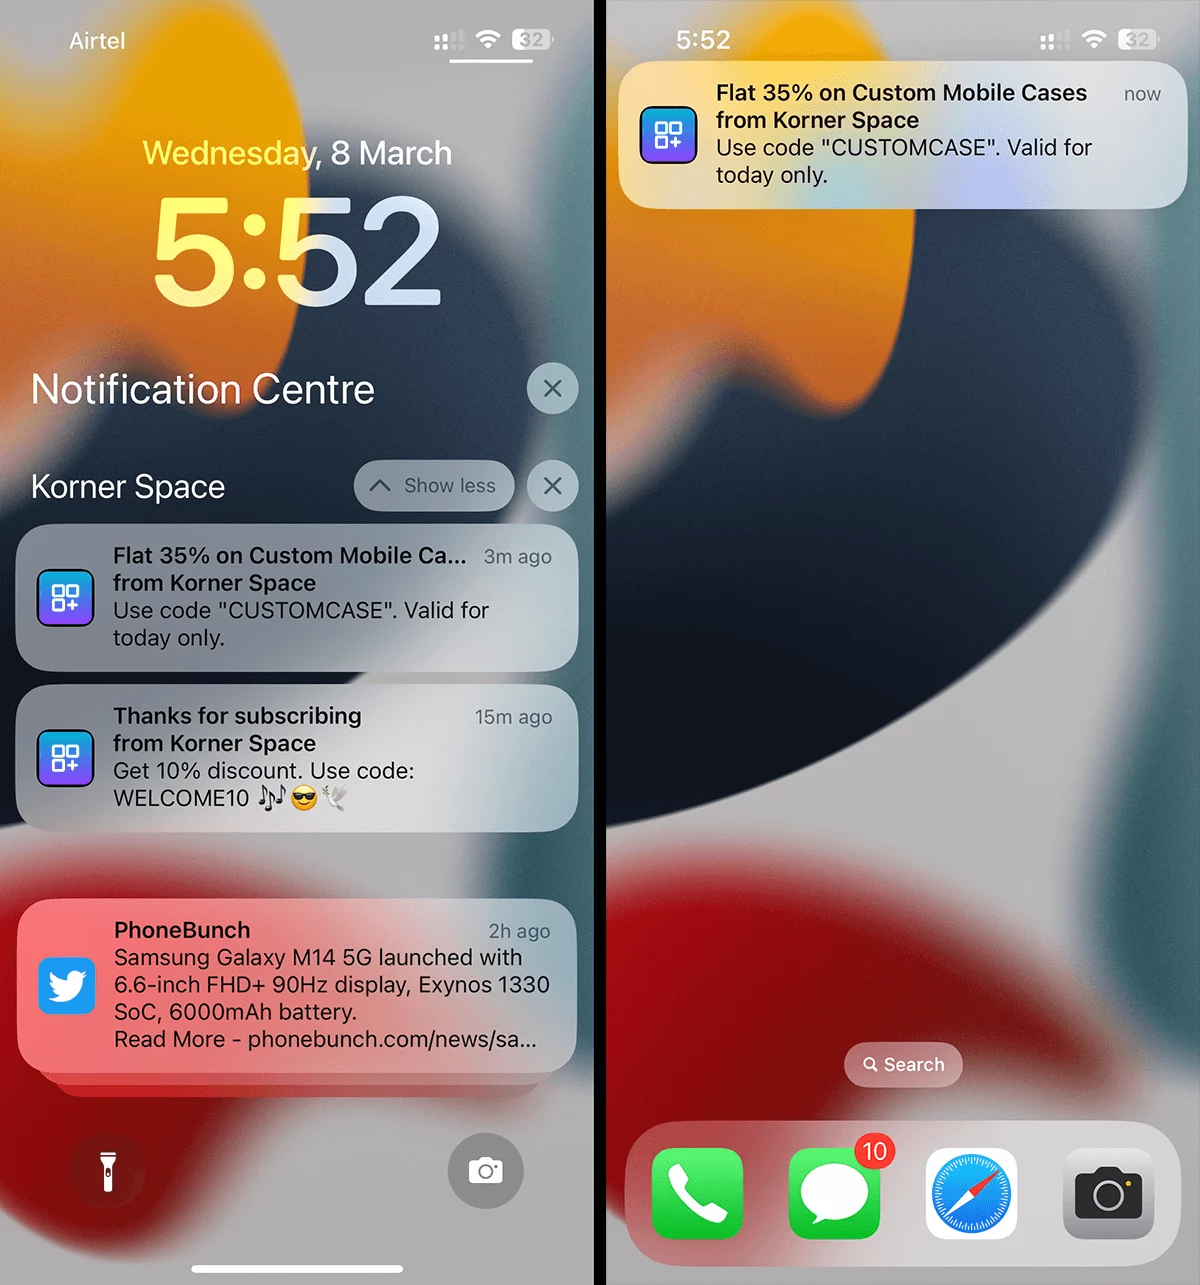
Notifications work on iOS similar to other apps. Web Push notifications on Safari are displayed on the screen as a heads-up notification, in the notification center and also on the lock screen. Once you click on the notification, it will take you to the desired landing page within the web app. Users can also manage their notification preferences from iOS Settings.
You can customize the title, message, landing page URL, as well as the icon to show on the notification. At present, iOS Safari push notifications do not support rich media, animated GIFs or videos. Once these features are added, we will enable them as well. Please follow the guidelines below to craft your notifications for iOS users.
Anatomy of a Web Push Notification for iOS Safari
With the addition of iOS, web push notifications are now available on all major Desktop and Mobile platforms. However, each platform shows them a bit differently than others. While we provide notification previews on our dashboard before you send a notification, it can be a daunting task to formulate notifications for each platform.
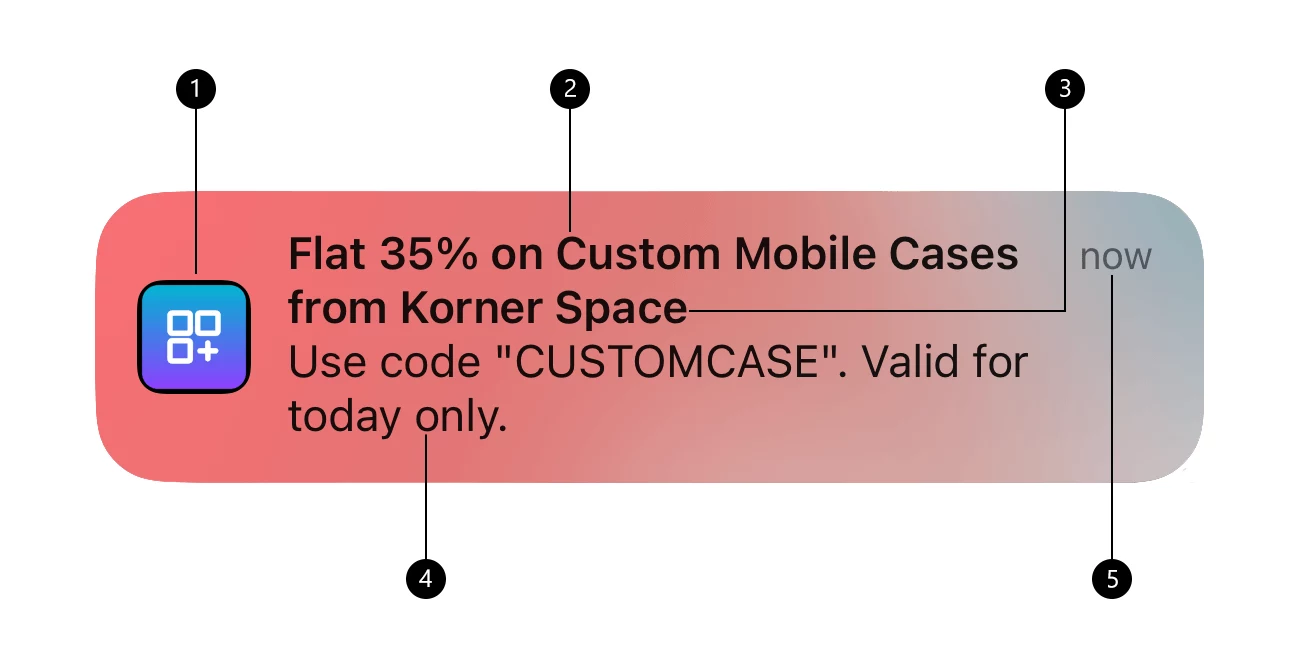
To help you create better notifications, here's an insight into how notifications look on iOS Safari.
- Icon
The default icon as set in the manifest, this is not edited for individual messages. - Title
Restricted to 30 characters, after which the text is truncated. - App Name
This shows the App name as saved in the Web Application Manifest in the following format - from App Name. This is not editable for individual messages. - Message
Restricted to 120-150 characters, after which the text is truncated. - Elapsed Time
Shows how long ago the notification was delivered to the device.
Web push notifications are supported on iOS 16.4 or later on Safari, Google Chrome and Edge only. Once Chrome, Firefox, Opera and other browsers add support, we will enable the service for those as well. Therefore for testing you would need an iPhone or iPad running on iOS 16.4 or later.